Do you remember when the first USB Pen Drives or Flash Disks
surfaced? The purpose of creating them was to replace the dying Floppy
Disk. I remember my first USB Flash Drive to be 128 MB, so that’s
approximately 85 floppy disks; believe me, it was something back then.
Today, Flash Drives replace CDs, DVDs and even small hard disks.
The
current Flash Drive generation goes from 2 GB up to 256+ GB (it’s hard
to find less than 2 GB these days). This guide will help if you have a
USB Flash Drive larger than 4 GB
Let’s say you went to the nearest
PC shop, bought a 16 GB Flash Drive, you were very excited, opened up
Steam to back up your favorite game and put it on the Flash Drive.
Oh
no, something is not right! You have a 16 GB USB Drive and are trying
to copy a 4 GB file but failing with the error message “no space
available in the destination folder”. You go berserk, and you start
wondering: “Do I have a fake USB Flash Drive?” Don’t jump to conclusions
so fast. There is an explanation to what is happening here.
You
see, the majority of Flash Drives come with a FAT32 File System; this
means that the destination drive won’t accept a file larger than 3 GB in
size, even if you have a 16, 32 or even 64 GB Drive.
To solve
your issue, all you have to do is to format your drive to the NTFS File
System, that way the drive will hold larger files and transferring data
will be much faster. This precedure is the same on Windows XP, Windows
Vista and Windows 7.
Let’s find out the difference between NTFS and Fat File System
Figure 1
Now, before following these steps,
please backup any files located on your flash drive that you want to
keep before you format it.
All files and folders on the flash drive will be deleted in this process.
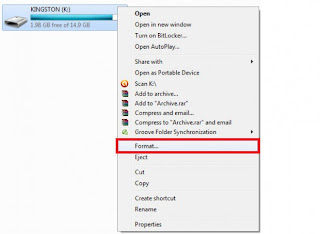
First, plug in your flash drive. When it appears in Computer right click on it and choose Format.
Figure 2
Now, if you are getting the warning
mentioned above “no space available in the destination folder” you
should see Fat32 (Default) under File System, as below.
Figure 3
Click on Fat32 (Default) and choose NTFS from the list and leave the allocation size as it is.
Figure 4
After that, you can choose the Volume
label; this is the name of your USB Flash Drive and can be set to
whatever you want. Keep Quick Format ticked and then click on Start.
A warning will appear; press OK to confirm that you wish to start the format.
Figure 5
So what have we done here?
Easy,
you’ve converted your Flash Drive’s File System to NTFS. It will now
accept large files and you may notice that file transfers are faster
now.
Please note:
The capacity size is very different from
the Allocation size. The first is the real size of the USB Flash Drive;
in the above pictures, the capacity is 14.7 GB, whereas the commercial
size of the USB is 16 GB. This will only show 14.7 because the hardware
manufacturers calculate the size based on the SI definition that 1 GB =
1000 MB but Windows will calculate it on the binary definition that 1 GB
= 1024 MB.
The Allocation Unit, also called sector, is the smallest
logical amount of disk space that can be allocated to hold a file. In
Fat32 each sector is not large enough to hold a file size larger than 3
GB, and when converted to NTFS, the operation will be faster because the
sectors are bigger.
Changing the allocation Unit needs a format,
but remember that the lower the allocation unit size, the less space
that is wasted, so take care of the allocation size you are giving to
your drive. If you are putting small files on your drive, keep the
allocation size small to avoid losing lots of free space. Copying small
files to a large Allocation Unit drive will waste free space.
exFAT
is a File System found on Flash Drives, that can be used when the NTFS
option is not available; exFAT can handle a very large allocation unit,
but be aware that exFAT is not widely supported outside Windows or Mac,
so if you are using your flash drive with your car’s Radio or on your
DVDplayer exFAT won’t usually be supported on these systems.
Pressing Restore Device Defaults will restore the Flash Drive to its
factory settings, usually FAT32 and the default allocation size. Don’t
be alarmed if you’ve pressed this button; it won’t work until you format
the Drive. Pressing close will simply cancel the command.
Formatting the drive with quick format checked will only cause the space
occupied by files to be available, but the files still physically exist
and can be restored with some Data restoration tools. Unchecking quick
format will erase all data and will check for any bad sectors on the
drive; that’s why the regular format will take much longer to complete.


No comments:
Post a Comment