
All you need to know about laptop repair.
Laptop computers can be complicated but laptop repair isn't as hard as the guys down the repair shop would have you believe.
We'll show you step by step instructions for replacing components, photos for jobs that are specific to a particular make of machine, guides to help you troubleshoot problems on your notebook, fixes for commonly encountered issues on different makes of machines and piles of good laptop repair info!
Repair Tips
Guys, don’t undertake laptop computer repair without reading this first. I’ll guide you away from making costly mistakes that could render your laptop computer useless.
First of all have a good understanding of what it is you need to do and what you might need in the way of tools. A big mistake people make is to sit down with a part and their laptop and use whatever they have around to open up the laptop and replace the part.
What you should try and have before you start..
- 1 x Philips Head Screwdriver type 0
- 1 x Philips Head Screwdriver type 1
- Tweezers ( long nose )
- ESD mat or grounded ESD wrist strap (ElectroStatic Discharge)
- Needle nose pliers

Back up your laptop's hard drive just in case you do something you shouldn’t have. Avoid doing your laptop computer repair in a carpeted room, use the kitchen or garage.
Keep in mind that if you are playing with the LCD the backlight inverter can give you a nasty shock if the unit is powered, switch the laptop off and unplug it, you should also remove the laptop's battery and hard drive.
I understand that most people won’t have any anti-static gear like wrist straps and so on but if you are going to be doing some laptop computer repair on a regular basis, it may be worth while getting some, although the laptop you have may be a cheap one there is no point killing it off and dumping it in the trash.
Some points to remember when undertaking laptop computer repairs..
- Don’t disassemble a machine if it doesn’t need it.
- Use the right tools.
- Try to do it in a clean environment.
- Test the machine properly beforehand
- Keep any parts you remove in a safe place.
- Keep the screws with the parts they have been taken from.
- Put the right size screws back into parts when it's time to reassemble it.
- Observe how connectors work before disconnecting them.
- Make notes for yourself if you need to as you pull apart the machine.
- Check all cables and connectors are fastened as you go along.
- Try not to use screwdrivers to lever or remove plastic parts.
- If a part won't budge look for hidden screws or a screw you may have missed.
- TAKE YOUR TIME.

Do it yourself
Laptop Keyboard Repair
Laptop keyboard repair is one of the more common jobs performed on laptops, it's also one of the easier repairs to carry out providing the following hasn't happened.
A spill of anything but water on a keyboard will 9 times out of 10 leave you in a situation that involves replacing the keyboard all together.
Keyboards are manufactured in such a way that leaves little to no room to clean out messy spills.
Basically any liquid containing sugar (soft drinks, beer, wine, coffee or tea) are bad news...
A couple of laptop keyboard repair do’s and don’ts in the event of a spill..
DON’T panic. Panic makes us do stupid things, think before you react.
DON’T use a hairdryer to dry out a spill...melted keys are hard to type with.
DON’T tilt the machine upside down or on its side (if you do feel the need it's better to tilt it to the side that houses the CDROM as the CDROM area inside the machine has less components on it than the mainboard).
DO switch the machine off immediately and resist switching it back on until you're certain the spill has dried. Survey the damage after you've dried it out. At this point you could remove the keyboard and try the machine using an external keyboard to see if anything else has been affected.
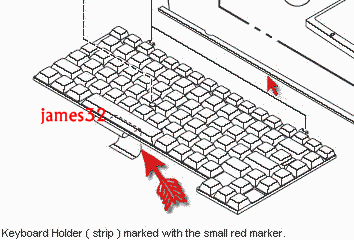
This diagram shows what a basic keyboard looks like, the ribbon cable which connects the keyboard to the motherboard is indicated by the red arrow.

Note the keyboard holder (thin strip of plastic) that sits on the top edge of the laptop keyboard needs to be removed to get access to the screws holding the keyboard down.
Most of the current laptop keyboards are like the diagram below.
How to replace a laptop keyboard
Keyboard removal is relatively simple, most keyboards are held in place with a couple of screws, and in some models, also a couple of screws that may need to be removed from the base of the unit. A quick call to your local authorized laptop computer repairer should help to determine what screws need to be removed (if they know their stuff).
The keyboard connector is something that needs a little care when unplugging, if you are too heavy handed and damage the connector in any way you may even damage the mainboard also which can cause a world of pain.. be careful.
See below for the most commonly used connector.

Broken off some keys??
Whoops, these are a difficult one to fix and once again often end in having to replace the keyboard entirely. Some very small plastic mounting arms hold the keys in place and are often broken, either that or the little clips that the mounting arms click into break. It's handy to have or get a hold of an old keyboard of the same type in order to poach the parts you need.
You may need some tweezers and a steady hand to fix these. The best thing I can suggest is to gently remove one of the other keys to see exactly how the mounting arms sit, once you have an idea of how it should look grab those tweezers and be patient, it may take some time.
We will soon have some detailed photos showing how these are assembled, until then remember to be patient and gentle.
If you seek professional advice regarding your laptop keyboard repair, the repairer will probably try to sell you a new keyboard complete with hefty labour charge to fix this for you. With the tips we have given you here, you can do your own laptop keyboard repair, fit it yourself and pocket the savings.
Backlight and Inverter
Well people, laptop screen repair will be something you will no doubt need info on at some point in your laptop's life... The symptoms are that the laptop display panel will flicker and then appear to switch off, but if you look closely you can still see a very faint image on the panel, almost like peering through the dark, this is because the backlight isn't lit.
Inverter boards have been an issue in a lot of makes and models of laptops – this is a very common fault. The inverter board loses proper connection causing the backlight to flicker or just simply fails altogether.
A little info in what we mean when we say 'Back Light'. Your screen has a fluorescent tube inside it which is just like your normal household tube except for its size, it's about 1/10 of the size. The tube is attached to a small circuit board via a cable, the circuit board acts like the starter in your household variety. This circuit board is called an 'Inverter or FL Inverter', the inverter provides regulated power to the fluorescent tube which lights up the screen.
If the Inverter fails then you appear to have no display, yes and no, the screen is still displaying the image but without light from the tube it only appears ever so faintly.
A lot of repairers will make the assumption that the LCD has failed and tell you about the enormous cost involved in a laptop screen repair to resurrect your beloved laptop, if you're unlucky this may be the case. Some repairers may even tell you it’s the main board because the video card has failed, they'll tell you that your laptop screen repair will involve replacing expensive circuit cards.. rubbish.
One way of verifying this for yourself is to connect an external monitor to your laptop's VGA port and flipping to dual display or external only display, if you get an image then you have narrowed it down to the inverter or the LCD panel.
The Inverter is a small PCB that is generally located in the LCD cover assembly close by the LCD itself. In most cases it can be found either screwed to the case underneath or along side the LCD panel.


Once you’ve taken that off, you'll have exposed the LCD and inverter which will both be connected to the LCD harness or wire loom that connects them both to the main board.

2. Connects to the Inverter board or FL inverter.
3. Connects to the main board.

The reason is that the pins develop a film on them and lose good connection with the plug that is plugged into them, it’s a good idea to clean the harness plug as well.
If you want to achieve a more permanent fix you will need to apply some Glue (Threebond 1530B) to the end that the harness plugs into (plug number 2, see left image), this will prevent the dirt film forming again on the pins over time.
Once this is done the unit can be reassembled and it should be OK. If you have a faulty inverter that needs replacing the cost will vary from place to place, but study our laptop screen repair guide and use the info to save yourself some money.
Laptop Overheating Issues:
Does your laptop shutdown at random? Does it slow down during heavy operations? Do you need to wait 10 min. before you can start it up again? These are all the symptoms of a laptop overheating problem in or around the cooling system.
What needs to be remembered is that a lot of the current laptops on the market today are running specifications that traditionally were reserved for desktops. Some even contain desktop CPU’s and a kick ass cooling system to match. Take a look at the cooling modules in some of the current Toshiba notebooks.
Anyhow, in order for these CPU’s to perform they have to be kept as cool as possible so manufacturers like Toshiba, Compaq/HP and the like struggle with the limited space and power to do this, hence they have had some laptop overheating issues.
If your laptop does show some of the symptoms mentioned before here’s what you can do..
On the under side of a lot of the machines you can gain access to the CPU/cooling module compartment, be warned – when tinkering around near the CPU, electro static discharge may be your worst nightmare - be careful to control ESD. Once you have located where the fan is you will be able to see quite clearly if this is your issue.. take a look below.
1: Heat sink
2: Fan
The heat sink runs off to the right of this picture and sits on the CPU, you can see the copper pipe running to the CPU here (1).
The fan and the heat sink have a small gap in between them, this is where dust will be sucked into and will accumulate.


You can use a soft paint brush safely enough here to loosen all the dust and then use a vacuum with a brush attachment to remove it. If you're game you can take the fan out (2 screws to remove) and give it a good clean out. This isn’t always so easy, on other models of notebooks the fan or fans are only accessible by removing the main board, not a job for a novice.
Dust build up inside a Toshiba Satellite A10 with the fan removed.

Once all the dust and lint is removed, re-assemble your machine. This procedure is something that should be done periodically to ensure that your laptop overheating issues will be a thing of the past.
Laptop LCD Repair Disassembly
If you're undertaking some laptop LCD repair, removing and replacing your screen means you are working with a very fragile and very expensive component.
Follow these steps carefully, the machine in the photos here is a Toshiba but the job is quite similar regardless of what brand machine you are working on.


Remove the mask stickers and then the screws from behind the stickers.

Carefully pull away the mask assembly from around the screen.


Remove the LCD mounting screws behind the stickers and also behind the inverter cable.

The LCD should now be free from its mountings.

Disconnect the cable from the back of the LCD.
To complete your laptop LCD repair and fit your new screen, just reverse the steps above.
To complete your laptop LCD repair and fit your new screen, just reverse the steps above.
Remove Laptop HDD
This is a photo guide to assist you to remove and replace your laptop
hard drive. In the photos here we are working on a current model Toshiba
but the procedure will be similar on most laptops.

Firstly, locate the hard drive bay and remove the cover screw.

Remove the bay cover to reveal the HDD.

Gently disconnect the hard disk from its connector as shown.

Check to ensure the connector pins haven't been bent, if they have
carefully bend them back into line with a small flat bladed screwdriver.
Remove the 4 screws from the harddrive bracket and take out the drive.


Laptop Power Plug / Jack Repairing
It's almost inevitable that you'll need to repair your laptop power plug
if you own a Toshiba Satellite A70 unless you've already had the main
board replaced in which Toshiba have applied a well overdue modification
similar to what you’ll see here.
The DC jacks on these units are
weakened over time with general use and become unstable and loose, in
some cases detaching themselves from the main board altogether.
In
the one we have pictured the plug detached from the board completely
and had to be resoldered and modified due to the rear pin connection
breaking away from the plug. You can see the red wire which had to be
added to replace the broken pin, this won't always have to be done.
Once
the plug has had all of its board mounted points resoldered it is
advisable to add an epoxy resin around the outer edge of the plug to fix
it to the main board, this will minimise movement when the adapter is
plugged into it.

Toshiba Satellite A70 with damaged AC plug. PCB view from the top after modification.
The above photo shows the points that need to be resoldered, the 3 points in a row above the red wire (which is our modify) and normally where the red wire is as well.
The above photo shows the points that need to be resoldered, the 3 points in a row above the red wire (which is our modify) and normally where the red wire is as well.


The red arrows in the above pictures indicate where resin has been added all around the base of the AC plug.
If you need to repair your laptop power plug, this fix will work well in just about any make of machine.
If you need to repair your laptop power plug, this fix will work well in just about any make of machine.
These are the great tips with good visualization.
ReplyDeletePerformance Upgrade for Laptop
thanks a lot !!!!!! finally I got very nice blog about PC Repair.Your tutorial is really very informative....
ReplyDeleteA laptop repair requires precision work and only the best should be called for as the years of experience in handling the issues will help resolving it in a more faster and better way. There are experts awaiting your call. In case, you require a personal attention to your system or have more hardware issues together with laptop screen repair, then all you need to do is fill the online form and they will be at your beck and call.
ReplyDeleteLaptop repair delhi